Adventures in amateur machine building

Category: Milwaukee 2HL Vertical Mill

Kearney and Trecker Saddle and Knee Repairs – Feed Selector, Turcite, and Wicking

While we have the Kearney and Trecker feed gearbox out and the saddle off the mill, it is time to address the sorry state of the lubrication system. While we are at it, we’ll rectify two nasty surprises we’ve found inside and under the saddle.

Reapplying Turcite to Saddle Bottom

Recall, the y-axis woes of this machine can be traced back to Turcite (or some generic substitute) that had lost adhesion and allowed swarf to accumulate under the saddle ways. Upon removal of the old material (most of which I could do by hand) it looked as if there was not much work done to ensure that the bottom saddle ways were flat and co-planar before applying the original Turcite.

Using the bottom of the saddle as a reference surface, I was able to verify that there was indeed .004″ or so deviation across the ways. Rather than spend an eternity hand scraping them flat — and keeping in mind that this will be covered by new slideway material — I selectively deployed an extended pneumatic cutoff tool as a grinder, taking light horizontal cuts.

Continue reading

Hand Scraping Kearney & Trecker Knee

It has been a minute since I’ve posted on the K&T 2HL overhaul, but rest assured, things have been very busy in the background. Having fixed the stripped feed gearing, work has focused on correcting the poor Y-axis travel behavior we noticed on the initial tear down. Recall, we were seeing the table rise around .005″ over just 8″ travel.

Fixing this ended up involving quite a bit of somewhat tedious hand scraping — in particular, scraping the top of the knee flat and perpendicular to the Z-axis quill travel and making sure the dovetail ways were parallel and aligned perpendicularly to the X-axis of travel . There are TONS of much better scraping hands out there and, for that matter, there are tons of better hand scraping tutorials. An expert I ain’t, but I’ve usually been able to get decent enough results in the past (and did so here) so in case it may be useful to someone, I’ll walk through my basic steps.

Continue reading

Repairing Kearney & Trecker stripped feed gear

From the recent teardown of the feed distribution gearbox on our K&T 2HL, we were able to trace our high speed feed problems to a stripped “tertiary high speed cluster gear” that has clearly suffered past catastrophic damage. Because this is a two-part cluster gear that rides along a splined shaft, the chances of finding a direct replacement that replicates the exact tooth count on both gears is about zero.

Fortunately, only one of the two gears that make up the cluster was damaged, and even more fortunately it only measured 1.25″ in diameter — less than the width of many off-the-shelf splined shaft sleeves that can be bought from places like McMaster. So here’s the repair strategy: we’ll take a stock splined shaft sleeve, turn one end to 1.25″, and cut a relief channel on a lathe. We’ll then cut the teeth into the sleeve, cut the old stripped gear from its undamaged partner, and then TIG weld the new gear to the old using the splined shaft to keep everything aligned. Because the splined sleeve is unhardened mild steel, we’ll have to case harden it to complete the repair.

Continue reading

How to Remove the Front of Knee and Disassemble the Feed Distribution Gearbox on a Kearney & Trecker 2HL

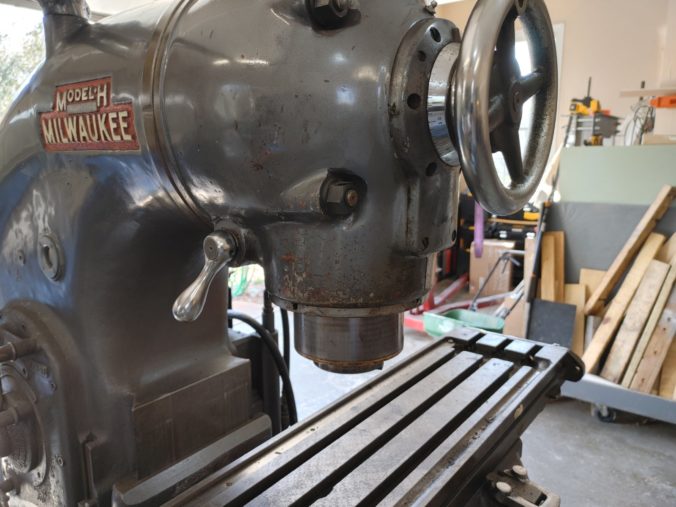
From our initial diagnosis we know that our Kearney & Trecker (Milwaukee) 2HL Vertical mill has issues with power feed at any speed over 7 or so inches per minute. To figure out what is going on, we’ll need to remove the front of the knee and disassemble the feed distribution gearbox. I won’t go into too much detail since there is an excellent video already out there, but there are a couple of key points I can reinforce here.

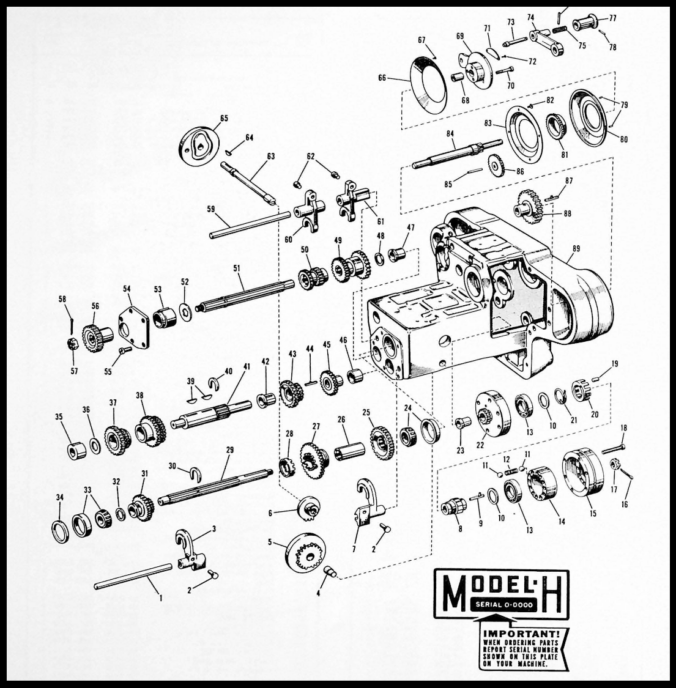
Most of the preparatory work to remove the box requires work on the left side of the mill, where there is a small right angle feed change worm gearbox (#9 in the parts diagram below the fold). It is held in place with three slotted screws. Before removing it, best practice is to go ahead and set the feed to the lowest setting to simplify the feed timing when the feed distribution box is reinstalled (see discussion below).

Next, we’ll need to remove the trip dogs (#52) that ride on the vertical and cross feed rods (#55 & #53). These are each held on by a cap screw and slide off to the rear. In my case, some previous jackassery had resulted in one of the cap screws being positioned such that it rubbed on the underside of the saddle. I’m not sure if this was what was throwing off the Y-axis precision as the table was cranked out, but I’ll be keeping my eye on this possibility.

Continue reading

Machining a Replacement Kearney & Trecker Hand Wheel

We’ll be taking a detour today from our CNC benchtop mill project for a quick “one afternoon” build for the Kearney & Trecker 2HL vertical mill. The Milwaukee was missing its y-axis hand wheel when I purchased it, but I figured at the time that I could pick one up cheap off of Ebay. After a couple of months of searching, I discovered that this was not the case and decided to machine one myself from a blank.

The design of the K&T hand wheel and crank is relatively simple. A boss extends (on my machine) 3/4 of an inch from the back of the wheel and passes through the throw levers for the table feed. It engages what I suppose is the y-axis screw by way of four teeth cut in an “X” configuration.

The shaft of the screw passes through the wheel, which allows it to slide on and off to engage the teeth when desired. The boss is just the right size to keep the feed lever from engaging while the hand wheel is engaged and vise-versa: while the lever is engaged, the hand wheel teeth can’t engage the screw.

Continue reading

Kearney & Trecker Model 2HL – Changing Fluids, First Chips, and Diagnosing Issues

Having temporarily repaired the quill clamp collar and gotten the Milwaukee milling machine running on a VFD, it is time to fire it up and see what we have on our hands. But first, as with any old machine, a good cleaning and change of fluids is in order.

A reprint of the original K&T lubrication guide is available at the excellent vintagemachinery.org site and walks through all the lubrication points. The spindle in these “swivel-head” mills is greased, which we handled when we had it apart to fix the clamp collar. Ditto the bearings in the motor, which we similarly cleaned and repacked when we had the motor out.

That leaves the oil in the oil reservoirs in the column, knee, and saddle (there are three).

Continue reading

Fixing broken quill clamp collar on Kearney & Trecker 2HL Vertical Mill

Now that we’ve got the Milwaukee milling machine running on shop 220V, we need to make it operational so we can use it to complete our CNC project.

One of the first things I noticed when I got the mill home was the jammed quill. Attempting to turn the hand wheel resulted in no movement. A bit of research led me to this great thread at Practical Machinist. Turns out that overzealous tightening of the quill clamp lever (#49 in the exploded parts diagram below) can result in fracturing of the cast iron clamp collar (#27). I immediately suspected this was my problem.

Continue reading